
(Not) Just Another Breathing Blog: 3 Simple and Effective Strategies for Improving Your Breath (and Life)
We’ve all read a blog here or there about breathing. Maybe it outlines the “21 benefits of breathing,” or tries to sell you on the idea of taking up a yoga class, or “just taking some deep breaths,” to relieve your stress. Check out these links, they are some of the best I could find!
But sadly the truth is, this hardly ever works.
How many deep breaths did you start taking? How many yoga classes did you sign up for. And how many did you go to? For most people, the answer is none.
And for some of those who actually do try to incorporate these recommendations, there’s seemingly little return. Why is this?
The problem is 2-fold:
The recommendation to “take a deep breath” lacks specificity. What is a deep breath?
There is often a lack of understanding of the problem. Why do we lose the ability to breath properly?
Today, we are going to tackle both of those. By the end of this blog post, you will:
Understand what the problem is
Have 3 simple and effective strategies that you can use today to improve your breathing (and life)
What is the problem?
At some point you’ve probably heard someone mention the benefit of belly breathing? Or diaphragmatic breathing? Or of taking a few deep breaths?
Everyone here is alluding to the same thing. We need to learn how to use our diaphragm. But how can we actually achieve that?
The major problems we have when it comes to using our diaphragm are:
We are out of position
Just like any other muscle, the diaphragm can be positioned in a way that promotes optimal function or suboptimal function. For many of us the latter is the reality
Our diaphragm can adapt over time to this position and become short and stiff, which further complicates the problem
The muscles that keep the diaphragm in the correct position become weak
If the diaphragm becomes short and stiff, the orientation of the ribs changes such that the abdominals and rib cage muscles can become weak and lengthened
So backing up a bit, what is a diaphragm?
The diaphragm is your primary muscle of inspiration and is used to create pressure to assist the lung in increasing in volume. The pressure created during the inhalation is then released on exhalation as the rib cages passively recoils back to it resting position. However, to get the best bang for our buck on the breath in, we need to:
Properly position the diaphragm
Have the proper amount of elastic recoil in the rib cage (so the rib cage more or less goes back automatically)

Note the diaphragm is a muscle. It attaches to the spine, sternum, rib cage, and blends fascially with the psoas. Thus the diaphragm plays an important role in stability of the thoracolumbopelvic canister.
Source: By OpenStax - https://cnx.org/contents/FPtK1zmh@8.25:fEI3C8Ot@10/Preface, CC BY 4.0, https://commons.wikimedia.org/w/index.php?curid=30131686
How can we properly position the diaphragm?
The diaphragm is a domed structure that lives below the ribs. The lowest part of this domed structure closely contacts the lower ribs. This area between the ribs and the domed portion of the diaphragm is known as the zone of apposition. Maximizing this zone is crucial to achieve optimal breathing efficiency. With the diaphragm operating in the correct position, and at thus at the optimal length, it is easy to generate the necessary pressure to fill the lungs with air.
In order to maximize this zone, we need to pull the ribs down towards the hips, which brings the lowest ribs down over the lowest portion of the dome of the diaphragm. This ensures that more of the lower part of the dome is in direct apposition to the inside of the lowest ribs. Hence, zone of apposition.

Note the Zone of Apposition Between the ribcage and the domed section of the diaphragm.
Source. Public Domain, https://commons.wikimedia.org/w/index.php?curid=335055
Some other reasons why this is important…
The ribs attach to the vertebrae in your spine. And if our goal is to raise the ribs, we extend or arch our back, and if our goal is to lower the ribs, we flex or bend our back. In this case, we (believe it or not) want to allow the back to bend naturally at and above the level of the lowest ribs. This positioning is crucial, because not only does it create an optimal zone of apposition, but due to the construction of the joints between your ribs and spine, having a natural bend in the back will allow the joints to move more freely, thus allowing the rib cage to expand more easily on the breath in, and to contract more easily on the breath out.
(In fact, contrary to what you see with many of these posture braces, or programs that try to get you to stand up straight, maintaining the spine in an overly extended position actually locks the joints of your mid-back, preventing other movements such as rotation from occurring. This is not good posture. This is a bad meme that needs to go away. Okay, off my soap box.)

Optimal Zone of Apposition: The front ribs are down, causing the diaphragm to dome.

Poor Zone of Apposition: The front ribs are elevated, causing the diaphragm to flatten. Over time, this position can lead to adaptive shortening and decreased flexibility of the diaphragm, impairing ability to create pressure necessary for optimal breathing.
How do we achieve proper elastic recoil of the chest wall?
Elastic recoil is the result of :
Being able to achieve a resting position that is closer to the position of the rib cage at the end of a breath out than at the end of a breath in. In other words, you can’t have the rib cage flared.
Having an optimal resting tone in the muscles that help you breathe out, because you need the pressure generated by those muscles to resist the increase in volume associated with the breath in. Additionally, these muscles need to be at the correct length in order to produce efficient effort for the breath out, especially during more intense efforts where a forceful exhalation is required.
To achieve this state, we need to:
Train our expiratory muscles to breath all the air out. This includes:
Rib-cage muscles
Transverse and internal oblique abdominals
Adopt a postural position that enhances the contribution of the expiratory muscles during breathing (which properly positions the diaphragm as well)
If we position the rib cage and abdominals in a position where they can optimally work, then they will better be able to depress the rib cage, thus enhancing the zone of apposition with the diaphragm
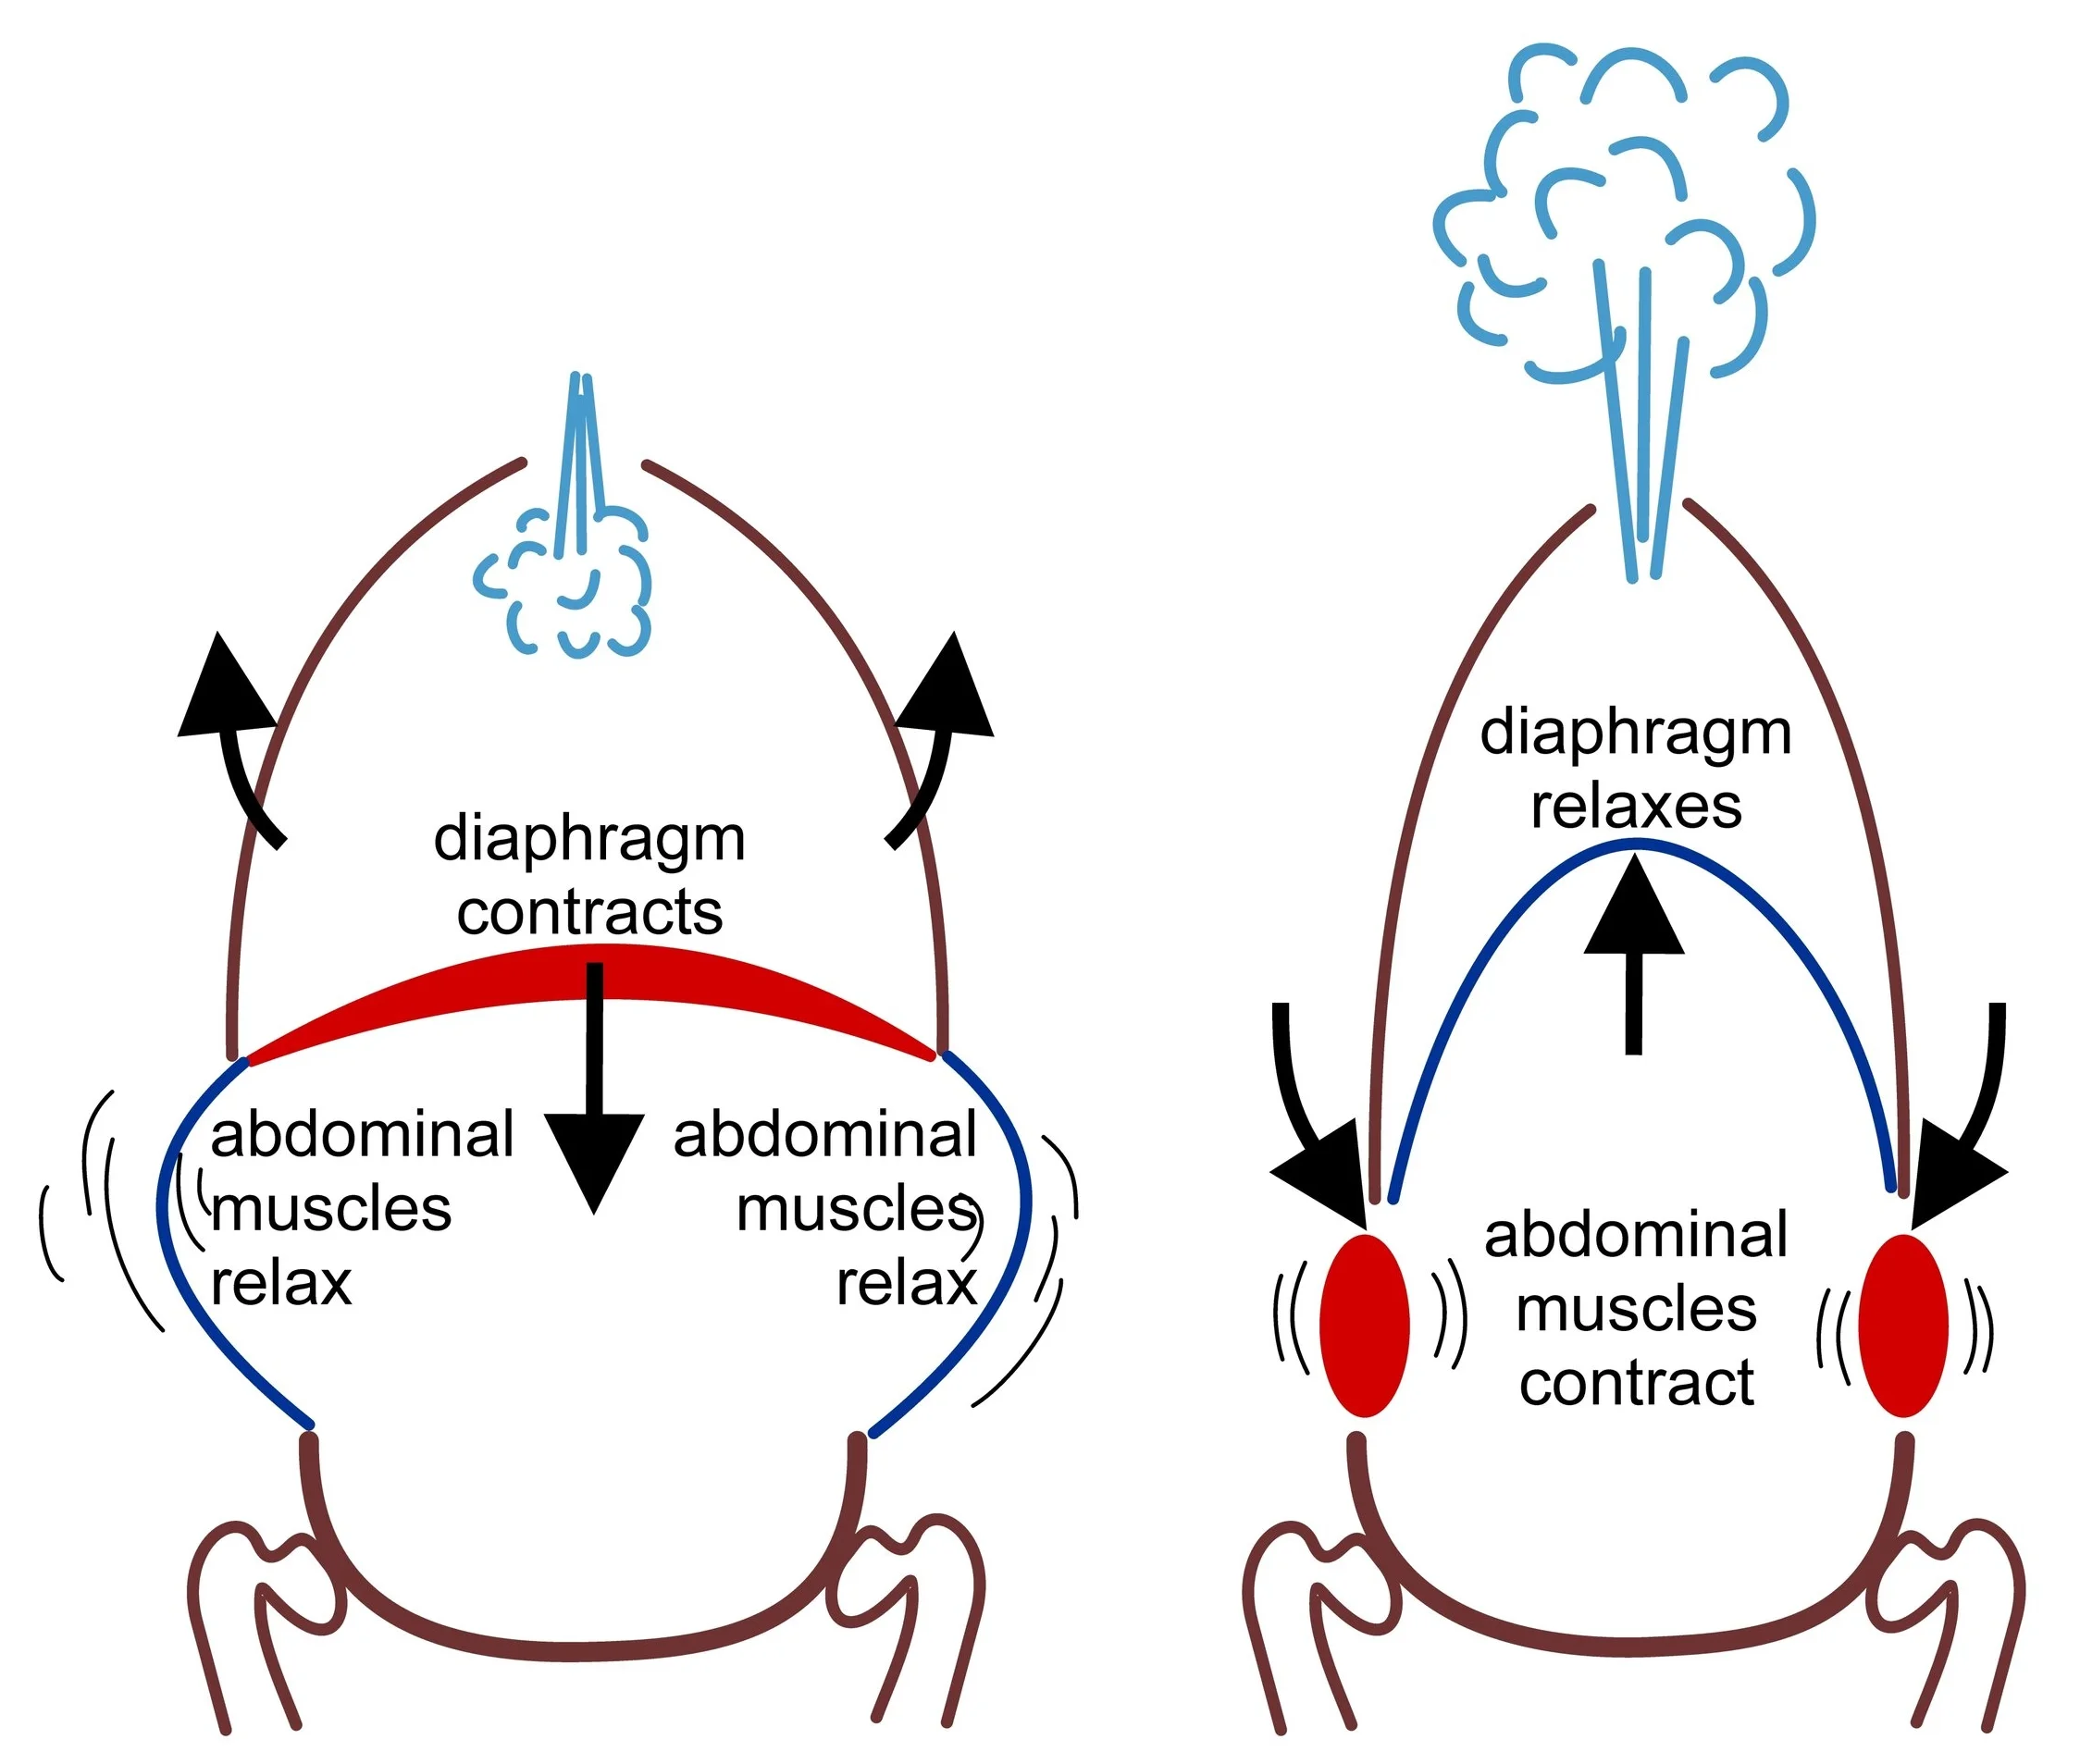
Note the relationship between contraction of the diaphragm and the abdominals. If the position of the rib cage is altered, this relationship is disturbed, resulting in weak abdominals, and a stiff diaphragm.
Source: Cruithne9 [CC BY-SA 4.0 (https://creativecommons.org/licenses/by-sa/4.0)], from Wikimedia Commons
Now to the fun part: How do we train our expiratory muscles?
Method:
Achieve proper position of the rib-cage relative to the diaphragm
Make sure to breath out all the air on each breath
Bring mental focus to the feeling of contracting the muscles underneath our rib cage and hold this contraction at the end of the breath prior to taking in another breath
Repeat very frequently.
Let’s start with the position:
Sit in a low chair with the knees slightly above the hips, feet flat on the floor, back rounded slight, hips tucked under.
Start performing quiet breathing, and try to quiet your mind.
Allow the rib cage to fall towards your hips, dropping lower on each exhale. Do not consciously try to tighten, contract, or force any positional changes. Imagine allowing the rib cage to fall with gravity.
Now we can show you my top 3 favorite techniques for improving expiratory muscle function:
Blowing up a balloon:
Gently place the tip of your tongue on the roof of your mouth on the hard palate behind your two front teeth. Keep it there throughout the exercise
Take a breath in without extending your back and without excessive effort. Imagine the breath filling your lungs from all directions. From the top, bottom, sides, front, back, and from every angle in between. Resist the urge to allow your breath to cause your rib-cage to expand in any one direction more so than the others.
Blow into the balloon while maintaining the position of your tongue, without excessive effort in the face, cheeks, or abdomen
You should feel a subtle tightening under the ribs in the front and side of your chest wall. Bring your awareness to the feeling of these muscles, and after you have blown out all the air possible without straining, hold this contraction for 3-5 seconds.
Repeat steps 2-4 for 3-5 breath cycles.
Blowing into a straw submerged in water:
Gently place the tip of your tongue on the roof of your mouth on the hard palate behind your two front teeth. Keep it there throughout the exercise
Take a breath in without extending your back and without excessive effort. Imagine the breath filling your lungs from all directions. From the top, bottom, sides, front, back, and from every angle in between. Resist the urge to allow your breath to cause your rib-cage to expand in any one direction more so than the others.
Blow into the straw while maintaining the position of your tongue, without excessive effort in the face, cheeks, or abdomen. There will be less resistance than with the balloon so less effort is more. Go for slow and controlled, which will train the inspiratory muscles to lengthen in a controlled manner.
You should feel a subtle tightening under the ribs in the front and side of your chest wall. Bring your awareness to the feeling of these muscles, and after you have blown out all the air possible without straining, hold this contraction for 3-5 seconds.
Repeat steps 2-4 for 3-5 breath cycles.
Tongue Trill:
Stick out your tongue slightly and allow your lips to rest on the top and bottom of your tongue. Keep it there throughout the exercise.
Take a breath in without extending your back and without excessive effort. Imagine the breath filling your lungs from all directions. From the top, bottom, sides, front, back, and from every angle in between. Resist the urge to allow your breath to cause your rib-cage to expand in any one direction more so than the others.
Blow while keeping the tongue and jaw relaxed, allowing your tongue to oscillate up and down, producing a “P” or “B” sound. There will be less resistance than with the balloon so less effort is more. Go for slow and controlled, which will train the inspiratory muscles to lengthen in a controlled manner.
You should feel a subtle tightening under the ribs in the front and side of your chest wall. Bring your awareness to the feeling of these muscles, and after you have blown out all the air possible without straining, hold this contraction for 3-5 seconds.
Repeat steps 2-4 for 3-5 breath cycles.
What benefits can you hope to get from adopting these practices? Just to name a few:
Enhanced efficiency of breathing
Improves blood oxygenation
Decrease blood pressure (mean)
Decreases fight or flight response, promotes relaxation
Enhances ability and speed to decrease physiological response to stressors
Improved posture
Decreased overall muscles tone
Decreased low back pain, SIJ pain
Improved abdominal muscle function
Improved back mobility
Improvement of headaches
Reduction of severity of symptoms associated with asthma
Improved cognitive performance (due to enhanced parasympathetic tone)
Improved sleep quality
Decreased neck pain/tension
Many more!
For best results, practice these techniques once per each waking hour of the day, when you wake up, before and after physical activity, before you go to bed, and every time you feel the stress coming on.
Give it 6-8 weeks of regular practice, and you will feel like a different person. Incorporate this as a long-term reset strategy, and your quality of life will be better.
For a demonstration of the techniques, and further anatomical explanation, check out the video:
Sources:
Laghi F, Tobin MJ. Disorders of the respiratory muscles. Am J Respir Crit Care Med. 2003;168:10–48.Wixted, F., O’Riordan, C. and O’Sullivan, L. (2018).
Inhibiting the Physiological Stress Effects of a Sustained Attention Task on Shoulder Muscle Activity. International Journal of Environmental Research and Public Health, 15(1), p.115.
Boyle KL, Olinick J, Lewis C. The value of blowing up a balloon. N Am J Sports Phys Ther. 2010;5(3):179-88.
Zammit C, Liddicoat H, Moonsie I, Makker H. Obesity and respiratory diseases. Int J Gen Med. 2010;3:335-43. Published 2010 Oct 20. doi:10.2147/IJGM.S11926
Russo MA, Santarelli DM, O'Rourke D. The physiological effects of slow breathing in the healthy human. Breathe (Sheff). 2017;13(4):298-309.
Stock up. A lot cheaper than going to the store!


This is perfect, not only in aesthetics, but also comes with a re-usable acrylic straw that will work great. Slight opening in the top allows air to come out as you blow. YAY!